

Article 008 - Introduction to WinGPIB's USER tab
- Details
- Published: Monday, 05 October 2026
- Hits: 56
WinGPIB – Using the USER Tab
1. Introduction
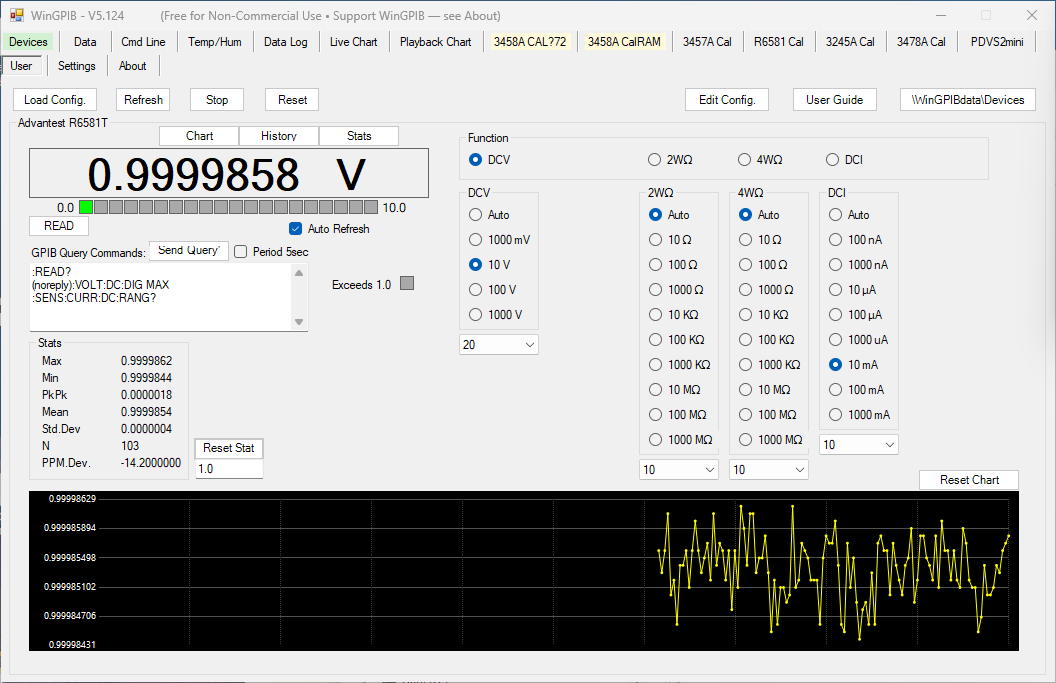
The USER tab lets you build your own instrument control panel inside WinGPIB, without writing any code. The panel is described by a plain-text configuration file that defines the layout (buttons, readouts, charts, switches and so on) and what each control does. When you load the file, the controls appear on the USER tab immediately and are ready to talk to your instrument.
Typically you use one configuration file per instrument, although a single file can control both Dev1 and Dev2 at once. Because it is just a text file, you can edit it in any text editor, or in the editor built into WinGPIB, and a layout can be tweaked and re-loaded in seconds. Beyond simple buttons and displays the USER tab also supports calculated values, live statistics, charts, automatic actions (triggers) and Lua scripting, all with full GPIB/SCPI communication.
The USER tab requires WinGPIB V4.088 or later. A number of ready-made example configurations and the full PDF guide (WinGPIB_User_Tab_INSTRUCTIONS.pdf) are included in the \WinGPIBdata\Devices folder.
2. Basic Operation
Along the top of the USER tab are seven buttons. The order I recommend is:
↓
RUN
↓
EDIT CONFIG. WHEN YOU WANT CHANGES
↓
SAVE & REFRESH, THEN RUN AGAIN
Load Config. and Refresh only build the panel, so you can safely load, look at and edit a layout without touching the instrument.
| Button | What it does |
|---|---|
| Load Config. | Opens a file dialog (starting in your \WinGPIBdata\Devices folder) so you can pick a configuration .txt file. The file is parsed and the controls are built straight away. Nothing is sent to the instrument at this point – WinGPIB waits until you press Run. |
| Run / Stop | Starts the panel. While running, the controls talk to the instrument and any BOOTCOMMANDS, auto-read checkboxes and triggers become active. The button changes to Stop, which halts it again. |
| Refresh | Reloads the config file that is currently loaded – use it after editing the file to see your changes. Any auto-repeat checkboxes are switched off first. Like Load, it only rebuilds the panel; press Run to go live again. |
| Reset | Clears the panel. Any pending instrument activity is cancelled, and any values you typed into text boxes are saved first (unless the file turns this off with DATASAVE). |
| Edit Config. | Opens the built-in User Config Editor on the currently loaded file (or asks you to choose a file if none is loaded). |
| User Guide | Opens the PDF user guide for the USER tab. |
| \WinGPIBdata\Devices | Opens the Devices folder in Windows Explorer, where the config files live. |
Loading a file
- Connect your instrument(s) on the DEVICES tab as usual.
- On the USER tab press Load Config. and choose a config file, for example one of the supplied demos.
- The panel is built. Press Run to start communicating.
Editing a file
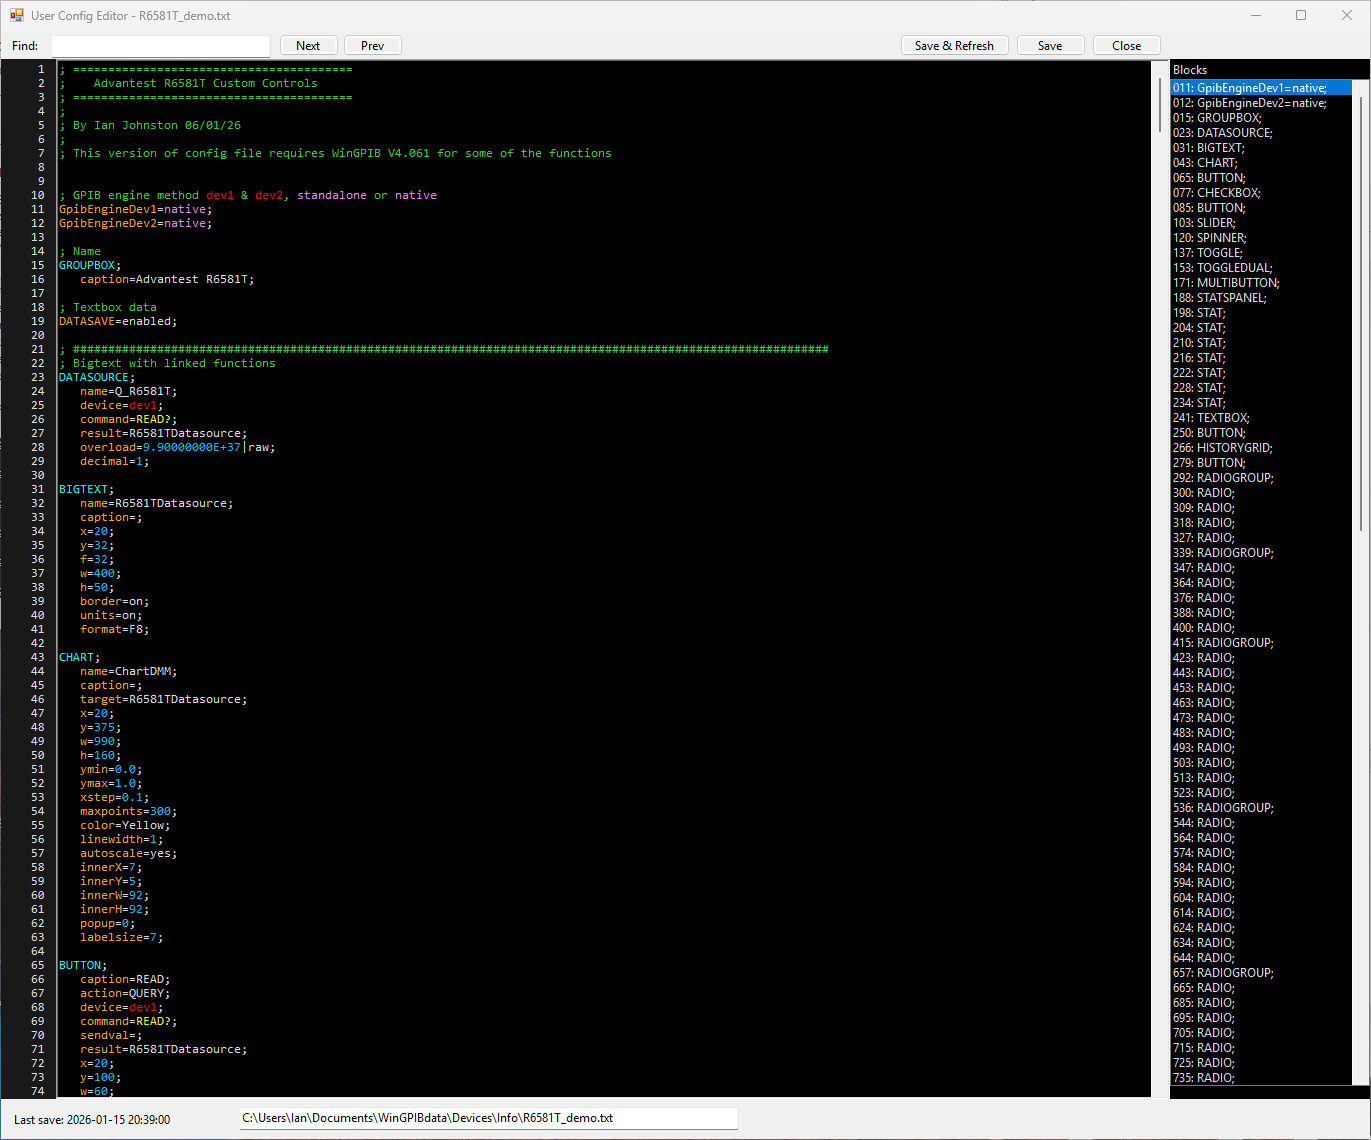
Press Edit Config. to open the editor. It has:
- Syntax highlighting for block headers, parameters and comments.
- Line numbers, and a clickable Blocks list down the side to jump around large files.
- Auto-indent and smart Enter behaviour.
- Right-click tools such as duplicate line, cut/copy/paste and Save.
- Ctrl+S to save, Ctrl+F to find (with F3 / Shift+F3 to step through matches).
- A Save & Refresh button, which saves the file and reloads it onto the USER tab in one step – the quickest way to try a change.
When a file loads, WinGPIB checks it for common mistakes (for example missing semicolons) and tells you if something needs fixing.
Config file basics
- Each control starts with a keyword (
BUTTON,SLIDER,RADIO, …) followed by a semicolon. - Settings are written as
key=value;pairs, one per line, indented by 3 spaces. A line that starts with whitespace is treated as a continuation of the control above it, so the indent matters. - Parameters can be in any order, and optional ones can be left out.
xandyset a control's position (andw/hits size) in pixels inside the User panel.- Lines beginning with
;are comments. Comments at the end of a line use a double semicolon;;. Blank lines are ignored. GpibEngineDev1=native;/GpibEngineDev2=native;select WinGPIB's standard engine, which keeps all its built-in device handling (terminators, device-specific cleaning and so on).standalonesends commands exactly as written with no extra processing. If omitted,nativeis used.
A very small example – a read button, a big display and an auto-refresh checkbox for a DMM on Dev1:
DATASOURCE;
   name=Q_ReadDMM;
   device=dev1;
   command=READ?;
   result=YourDMM;

BIGTEXT;
   name=YourDMM;
   x=20;
   y=35;
   f=32;
   w=400;
   h=50;

BUTTON;
   caption=READ;
   action=QUERY;
   device=dev1;
   command=READ?;
   result=YourDMM;
   x=20;
   y=100;
   w=120;
   h=30;

CHECKBOX;
   name=YourDMM;
   caption=Auto 0.5s:;
   func=FuncAuto;
   param=0.5;
   x=160;
   y=105;
The key idea is the result name (YourDMM above). Anything that produces a reading (a DATASOURCE or a QUERY button) writes to a named result, and any display control that uses the same name – BIGTEXT, CHART, STATSPANEL, HISTORYGRID, LED – updates automatically.
3. Commands & Controls
Setup and structure
| Keyword | Purpose |
|---|---|
GpibEngineDev1 / GpibEngineDev2 | Choose native (default) or standalone communication for each device. |
BOOTCOMMANDS | A list of commands (commandlist=) sent once when the config is loaded, in order, with an optional DelayPerCmd= between them. Good for reset, range and NPLC setup. |
DATASOURCE | An invisible “reading producer”: a device, a query command and a result= name. Lets checkboxes auto-read without needing a visible button. Optional overload= token and decimal=. |
CALC | Creates a new result from existing ones with a simple expression (+ - * / and brackets), e.g. expr=Reading*1000. Add |F6 to set the output format. |
TAB | Splits the layout into sub-tabs. Everything above the first TAB; block goes on the default Main tab. |
GROUPBOX | A framed container with a caption. Controls can be placed inside it with parent=, and hiding the box hides everything in it. |
DATASAVE=enabled|disabled | Whether text box contents are saved and restored when the same config is reloaded (default: enabled). |
; and ;; | Full-line comment and end-of-line comment. |
Controls that send commands
| Control | What it does |
|---|---|
BUTTON | Runs an action= when pressed (see the action list below). |
MULTIBUTTON | A row of 2–10 buttons where one is active at a time – ideal for function selection (ACV / DCV / R2W…). Highlights the current instrument state via determine= and detmap=. |
TOGGLE | One button that alternates between an on= and an off= command, with optional colours. Several commands can be sent at once by separating them with §. |
TOGGLEDUAL | Two side-by-side buttons (left = ON, right = OFF), the active side lit. |
DROPDOWN | Sends a command as soon as you choose an item – either a prefix plus the chosen item (command=) or a full command per item (commands=). The first entry is a placeholder that sends nothing. |
RADIOGROUP / RADIO | A framed group of radio buttons; selecting one sends its command. A RADIO can also set a display scale (scale=, including auto with a range query), units and decimal places. |
SLIDER | A trackbar (min, max, step, scale) that sends the command plus value when you release the mouse. |
SPINNER | A numeric up/down box that sends the command plus the scaled value each time it changes. |
TEXTBOX | Entry or display box. Use it to type a value for a SENDVALUE button, or (with readonly=true) to show a result. |
TEXTAREA | A multi-line box for a list of commands (separate lines with | in init=), run by a SENDLINES or QUERIESTOFILE button, or for Lua scripts. Also useful as a log window. |
KEYPAD | An on-screen numeric keypad (fixed or pop-up) for typing into text boxes – handy on touch-screens. |
Controls that show results
| Control | What it does |
|---|---|
BIGTEXT | Large digital-style readout, optionally with units, border and a pop-up version. |
LABEL | Fixed text anywhere on the panel, with adjustable font size (f=). |
LED | Indicator that goes ON (1, ON, TRUE, HIGH, any non-zero number), OFF (0, OFF, FALSE, LOW, empty) or BAD (anything else), with configurable colours. |
CHART | Rolling chart of a result, with fixed or auto-scaling Y axis, buffer length, colour, line width and an optional pop-out window. |
STATSPANEL / STAT | Live statistics panel. Add one STAT row per value: MIN, MAX, PKPK, MEAN, STD, LAST, COUNT, PPM. PPM can be taken from the running mean, the first reading, a fixed number, or a text box (ref=@RefPPM). |
HISTORYGRID | Rolling table of readings (newest at top) with optional Time, Min, Max, PkPk, Mean, Std, PPM and Count columns. |
HR / VR | Horizontal and vertical separator lines for tidy layouts. |
Controls that change behaviour
| Control | What it does |
|---|---|
CHECKBOX | Applies a func= to the named result(s): FuncDecimal (show scientific notation as plain decimals), FuncAuto (repeat the query every param= seconds, down to 0.001 s) or FuncTrigEnable (switch a named trigger on and off). |
INVISIBILITY | Registers a show/hide function for one or more controls. A button whose result= matches the function name toggles them. Ideal for crowded panels. |
TRIGGER | An automatic rule: when a condition becomes true (e.g. stats:Stats1.std > 0.0005), run one or more actions. See the trigger actions below. |
Button actions
Set with action= in a BUTTON entry.
| Action | What it does |
|---|---|
SEND | Sends command= exactly as written. |
SENDVALUE | Sends command= followed by the current value of the named source, e.g. a text box (APPLY DCV, 1.234). |
QUERY | Sends a query and writes the reply to result=, updating every display bound to that name. |
SENDLINES | Sends each line of a TEXTAREA to the instrument in turn (lines starting with ; are skipped). |
QUERIESTOFILE | Runs every line of a TEXTAREA and logs time, device, command and response to a CSV file. Prefix a line with (noreply) for commands that return nothing. |
CLEARCHART | Clears one or more charts (target=Chart1; to clear several, separate the names with the § symbol). No GPIB traffic. |
RESETSTATS | Clears the accumulated statistics of a STATSPANEL (name it in device=; several panels can be separated with §). |
CLEARHISTORY | Clears a HISTORYGRID. |
RUNLUA / STOPLUA / CLEARLUA | Run, stop or clear a Lua script (see below). |
A button with no action, just a result= name, is used with INVISIBILITY to show and hide controls.
Trigger actions
Used in a TRIGGER’s then= (or do=). Chain several with the | character.
| Action | What it does |
|---|---|
fire:ButtonName | Presses a button as if you had clicked it. |
SEND:dev:command | Sends a command to a device. |
QUERY:dev:command->ResultName | Queries a device and stores the reply in a result. |
SET:ResultName=Number | Writes a number to a result. |
LED:LedName=ON|OFF|BAD | Sets an LED. |
resetstats:Panel / clearchart:Chart | Resets a stats panel or clears a chart. |
show: / hide: / togglevis: | Shows, hides or toggles named controls. |
runlua:ScriptName | Runs a Lua script stored in the config file. |
enabletrig: / disabletrig: | Turns another trigger on or off, so triggers can be chained. |
Conditions can use stats:Panel.mean / std / min / max / pkpk / count / ppm, num:TextBoxName, bignum:BigTextName, any result name or an LED name, with the comparisons > < >= <= == !=. A trigger fires when its condition changes from false to true; need= sets how many consecutive checks must pass first.
Matching the panel to the instrument – determine=
RADIO, DROPDOWN, SLIDER, SPINNER, TOGGLE, TOGGLEDUAL and MULTIBUTTON can read the instrument’s current setting when the config is loaded, so the controls start out showing what the instrument is really set to. The form is determine=query|expected|resptext (text match) or determine=query|expected (numeric match). No commands that change the instrument are sent while doing this.
Lua scripting
For anything more elaborate, you can run Lua scripts, either typed into a TEXTAREA on the USER tab or stored in the config file between LUASCRIPTBEGIN;name=MyScript and LUASCRIPTEND and run with a RUNLUA button. The devices are called "dev1" and "dev2" in scripts. Lua scripts need the native engine.
| Function | What it does |
|---|---|
send(dev, cmd) | Sends a command, no reply expected. |
query(dev, cmd) | Sends a command and returns the reply as a string. |
logto(box, text) | Writes a line to a named log TEXTAREA. |
settext(name, value) | Puts text into a named text box or label (or BIGTEXT). |
setnum(name, value) | Publishes a number as a result, so triggers and displays can use it. |
getnum(name) | Reads a named value as a number. |
setled(name, state) | Sets an LED to ON, OFF or BAD. |
fire(button) | Presses a button, including buttons on other WinGPIB tabs. |
sleep(ms) | Pauses the script (the Stop button still works during a sleep). |
doui() | Lets the display repaint during a long script. |
now() | Returns the current time as hour, min and sec. |
There is also a built-in set of maths and metrology helpers for calibration and linearity work:
| Function | What it does |
|---|---|
ppmerror(measured, nominal) | Error in parts per million relative to a nominal value. |
twopointcal(m1, t1, m2, t2) | Returns gain and offset from two calibration points. |
applycal(measured, gain, offset) | Applies gain and offset to a reading. |
linefit(xs, ys) | Least-squares straight line: slope, intercept and R². |
polyfit(xs, ys, degree) | Least-squares polynomial fit of any degree. |
polyeval(x, a0, a1, …) | Evaluates a polynomial at x. |
polyder(coeffs) / polyint(coeffs, c) | Derivative and integral of a polynomial. |
solve2 / solve3 / solve4 | Roots of quadratic, cubic and quartic polynomials. |
realroots / realrootssorted | Filter a set of roots down to the real ones (sorted, for the second). |
Example: five readings from a Lua script
LUASCRIPTBEGIN;name=FiveReads
for i = 1, 5 do
   local r = query("dev1", ":READ?")
   settext("BigTextLua", r)
   logto("LuaLog", "Reading " .. i .. " = " .. r)
   doui()
   sleep(1000)
end
LUASCRIPTEND

BUTTON;
   caption=Run Lua;
   action=RUNLUA;
   command=FiveReads;
   x=20;
   y=170;
   w=180;
   h=30;
4. Where to Go Next
The best way to learn is to load one of the demo configurations from the \WinGPIBdata\Devices folder, press Edit Config., change a few values and use Save & Refresh to see the result. The full reference, with every parameter and many more examples, is in the User Guide PDF (the User Guide button).
